


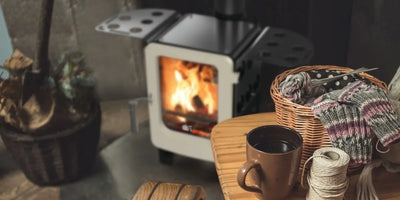

Opening up a fireplace for a wood stove
5 mins
Opening up a fireplace and making it bigger
Fireplace too small?
Note: We do not offer fitting advice on inset stoves as they can be tricky (inset stoves are those that fit flush to the wall and you cannot see the fireplace recess). You may still find this article useful but stove clearances will be different.
Regulations for solid fuel can be found in (Document J of the Building Regulations). The “breakout” to open up the fireplace (stove fitters call this the builder’s opening) is usually, for the stove fitter, a simple process that typically takes 2-3 hours for a small recess, a couple of hours longer for a medium recess/inglenook and up to a full day for a large inglenook (assuming two people in all cases). Below are examples followed by an excavation timelapse...


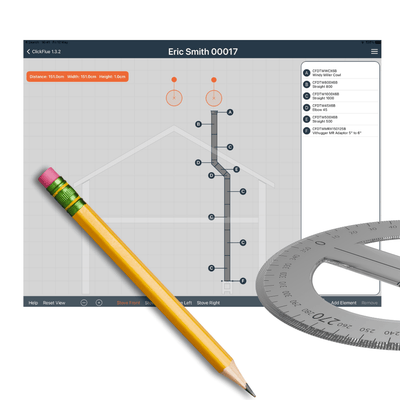
Fireplace excavation timeline (off-site)
What do you need to open up a fireplace?
You will require a skip or area to put rubble and rubbish. You will need an SDS-type drill with a chisel bit and hammer function (the more powerful the better as a general rule; these can be hired although very powerful hire models can be rather heavy to use). I have purchased and used drills with hammer chisel functions at £50, £110 and £500. All did the job, with the £500 drill (my present drill) being the best, as one would expect. You will need buckets, for transporting rubble to skip; gloves; face mask; torch; hard hat. Brick built chimneys: An easy job for your local builder. Perfectly reasonable DIY project for a fit person although larger recesses (opening wider than one metre) require caution (or acro-props/strong boys) unless a suitable lintel is in place. Stone-built chimneys/chimney breasts/walls: Great care must be taken to ensure a suitable lintel is in place before excavating (stone is far less stable than brick when knocking holes in walls). If in doubt get the builder’s in for the excavate. Note that you can remove plaster from walls to find lintels before doing anything that might cause a problem.
Do you need Building Control permission for excavating a fireplace?
No you do not. But Building Regulations do apply and the appropriate rules should be followed. An example is the correct fitting of a lintel.
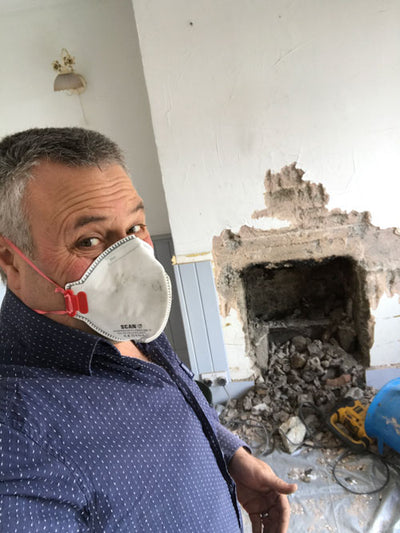
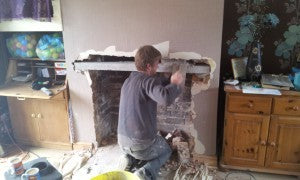
Typical scenes an installer will see
If you have a chimney (a proper chimney stack) but do not have a recess suitable for even the smallest of solid fuel stoves then you will very likely be looking at an open fire, gas fire, electric fire, little hole in the wall or a boarded/bricked up recess. How do you know that there is definitely a builder’s opening (fireplace) somewhere? You don’t. In my experience if you see a picture like anything below then in 98% plus of cases there is a larger fireplace/builder’s opening (how much larger exactly is usually more unknown). You might need to make a bit of a mess to find out definitely – e.g. remove cladding or plastering, but you should be able to find out what the score is before you start excavating anything. Excavating a fireplace/builder’s opening means nothing more than taking out the brick/stone/rubble/concrete that somebody has filled the opening in with. Nothing structural needs to be touched. A few pictures of common situations below (90% of the surveys I do are similar to one of the following pictures):

Gas fire against cladded wall or chimney breast. Somewhere behind all that cladding is a builder’s opening. For a free standing stove the cladding has to go!

Gas fire against chimney breast. Somewhere behind is a builder’s opening.

Small open fire in chimney breast but there will be a builder's opening behind.

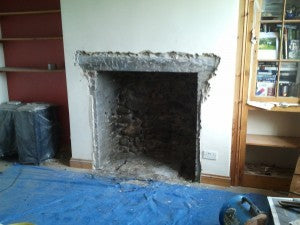
Hole in chimney breast after removing electric or gas fire (breaking out started in this example).

Hole in chimney breast after gas fire removed but there will be a builder's opening behind.
Bear in mind that gas and electric fires are usually just devices placed in front of or within small open fire apertures. The overall task in each case is 1. the removal of any existing surround, fireplace and hearth 2. excavation back to the origonal fireplace/builder’s opening. The end result is a recess for your stove to live in (larger fireplaces/builder’s openings are often known as inglenooks). During this article the terms “recess”, “builder’s opening”, “opening” or”original fireplace” mean the same. TIME TO CALL IN THE EXPERTS? Gas fires and electric fires require disconnecting by a qualified tradesman prior to any breakout work proceeding. Ensure that the qualified tradesman removes any live services from the working area (e.g. a gas pipe to a gas fire might be capped off under skirting boards well away from the stove area).
What fireplace recess size will you find?
You have purchased the stove already? I thought that I should deal with this early on… Assuming that your opening has no combustible materials present (the opening is made of brick or stone with no wooden lintel), then it’s surfaces are classed as “non-combustible”. Non-combustible recesses are not subject to any building regulations. But stoves will require air gaps around them – the distances provided by stove manufacturers (often provided too late within the fitting instructions that come with the stove). These figures are usually between 1″ and 3″ at the sides, 2″ to 3″ behind and 12″ or more above. THERE IS NO LEGAL MINIMUM TO NON-COMBUSTIBLE MATERIALS - IT IS NOT A SAFETY ISSUE.

The figures I have provided above are just examples; each stove will have different manufacturer’s requirements. These air gaps are usually requested by the manufacturer for two reasons: 1. To stop the walls of the recess overheating. 2. To ensure the heat from the stove makes it to the room (shove a stove in a tight hole and you will likely not be as warm as you hoped due to your stove heating the wall rather than the air for the room).
Where any safety issue is concerned manufacturer’s specifications override building regulations and should be followed to the letter.
A combustible material is any material that can catch fire (e.g. wood, plastic, cloth).
If you have any COMBUSTIBLE MATERIALS anywhere near your recess INCLUDING ANY WOODEN BEAM (the main offender) then you need to look at the section distance to combustibles as there are serious building regulations involved (wall paper outside of the recess can be disregarded as a combustible material but plasterboard is classed as combustible “because it is not classified as non-combustible”). With regard to combustibles, building regulations state that a stove must be a minimum of 6″ from any combustible material
But if a stove manufacturer specifically asks for more - best to do as they say.
Your flue pipe (pipe that leaves stove) will also need to be a LONG way from combustibles (3 times the diameter of the pipe away – so 18″ for a 6″ flue pipe and 15″ for a 5″ pipe) with this buildingb regulation often ensuring a wooden beam is not feasible (protecting the beam using building regulation recommended methods can reduce this distance to 1.5 times the diameter of the pipe and once again this can be found within distance to combustibles).
Small recess?: An inset stove might fit into a small builder’s opening or directly into a small open fire recess (see inset stoves). Small builder’s opening/original fireplace?: A builder might be happy to increase the size for you. Q: My builder’s opening is a little too small and cannot be made larger. Assuming there are no combustible materials issues can’t I connect my flue pipe to the back of the stove (rather than the top) so the stove sits “mainly forward of the recess” providing good air circulation to most of the stove?

I think that this is a reasonable way to go, especially if the stove requires 6″ either side but the recess allows an inch or two less. If your stove has a 45 degree rear-attachment option, designed for “sweeping through the stove”, then this option is worth investigating (e.g. Charnwood C-Series). Note that there are no safety issues being a little closer than a manufacturer requests if the fireplace is brick or stone. The heat from the stove will certainly, in this case, because much of the stove is in the room rather than in the recess, invade the room. My only slight concern here is whether stove warranty might be affected in any way due to the rear part of the stove not having side clearances as specified in the installation instructions (would be a mean trick in my opinion). Do not use a T connector at the rear of your stove (unless there is a way for the sweep to access the soot collection part of the T and sweep successfully).
It is advised that you do not purchase a stove until you know the size of your builder’s opening and the stove clearances are known.
Clearance to both non-combustible materials (brick/concrete etc.) and combustible materials (surrounds/wooden beams etc.) are also covered further during the stove fitting sections.
Before you start look for clues
Before you start attacking your stone or brickwork you should be looking at your fireplace with the eye of the detective – what clues does it present at this early stage? Stove fitter’s top tip: Has a neighbour opened up his builder’s opening? If the house is the same style/same builder then the opening and lintel will often be identical. The most obvious thing to do, if possible, is shine a torch into the existing recess. You might be able to see the back wall and sides of the recess, maybe above the tapered bricks or rubble used to fill in the builder’s opening. If you cannot see anything at this stage then you will be getting the torch out again – as you open up your recess with the hammer drill. Let’s look at a few of my hand-scribbled diagrams:

How far in is the back wall (note that the shaded area is infill to be removed). Click for larger image.

Typical builder’s opening when flue is brick or stone and small open fire or gas fire has been fitted. Note that a tapering (the structural “gather” that should not be touched) may or may not be evident – the chimney may be as wide as the builder’s opening all the way to the top of the chimney. The “shoulders” of the builder’s opening are interlocking structural brickwork known as the “gather”.

Typical builder’s opening. Brick or stone flue. Offset to one side (you will often see this shape from the outside when walking down the side of a house). Your torch should assist you to see the smooth right hand wall above the 45 degree “brick/rubble”. This gather has only one shoulder.

Typical builder’s opening with pot-lined chimney. Once again, the left hand slope is the “gather” and is structural. Slightly trickier than non pot-lined. You remove as much of the dotted area as you wish. The remainder will require supporting with some kind of lintel raft (explained shortly).
If you have a chimney breast then you may have a limited idea of the width of the builder’s opening – if it’s a five foot wide breast then your opening is not going to be a five foot inglenook! The side jambs of the fireplace, the legs that hold the brickwork up, will each likely be at least a foot wide (certainly not less than 8″ and a lot more if stone) so the opening will be somewhere in the space in between e.g. 3 ft. It might be the case that the chimney breast is wide but the recess is narrow (e.g. six foot wide breast with 2 foot wide recess) – there are no rules here.

Will my builder’s opening/fireplace be large enough for the stove?
If you do not have a chimney breast around the fireplace then check the other side of the wall (outside, in the adjoining room, in the garage etc.) as there may be a chimney breast on the other side. External chimney breasts often provide a perfect idea of the shape one is dealing with. Note that there is a difference between “infill” used to make a fireplace smaller and the “gather”, used to form a channel for the smoke to go from large fireplace to tight chimney flue. SOMETIMES YOUR ARCH OR LINTEL MAY BE ABOVE THE GATHER (especially if you have raised the lintel in order to fit the stove in the recess). Infill bricks will not be interlocked into the structure of the building, merely stacked within with mortar in between. Gathers are structural and are interlocked and this is usually very obvious. In the picture below all the infill was removed but the gather, the bricks in the top left and top right of the opening, is interlocked and structural and should not be disturbed.


Once you work out whether this wall is one brick or two bricks thick you can then work out the width of this builder’s opening. At the very least you can work out a minimum and maximum.
NOTE: THIS ARTICLE USES THE TERMINOLOGY FOR A BRICK BUILT CHIMNEY. FOR STONE PROPERTIES THE PROCESS IS THE SAME ALTHOUGH WHERE A BUILDER’S OPENING STARTS AND ENDS CAN BE A LITTLE LESS EASY TO DEFINE (no perfectly smooth walls to find).
Let the fireplace breakout begin
Remove any mantlepiece or metal fireplace gubbins
If you have a wooden simple surround (e.g. mantlepiece) now is the time to remove it if you have not already done so: surrounds are usually held in place by a number of tabs that are hidden just underneath the surface of the plaster. These tabs are screwed into the wall. Sometimes surrounds are stuck to the wall with adhesive. You should be able to remove any surround without damage to the surround. Metal fireplaces: these can be simple to remove (e.g. screws) or an absolute pain (set in various types of concete mix). You’ll get one out using a suitable lever or the chisel drill – whether you can save it for resale (is it worth it?) is up to your own efforts.

Find or fit your arch or lintel
Removing plaster to expose a lintel or arch is the single most important advice in this article: remove the plaster and you see the picture.
If you do know the size of your recess then you are already ahead of the game – but removing plaster from the wall around the recess area, with the SDS chisel first, so often helps see what is happening. Keep removing the plaster up and up you go until you find an arch or lintel or are sure one is not present (unusual but it happens).
Check for wiring and gas pipes
You have got rid of any gas or electric fire at this stage and there are no live pipes or wires in the working area?If you are removing an old gas fire and find a flexible metal liner (usually 5″ diameter) then remove it. Gas liners cannot be used on solid fuel. Gas liners feel more tinny than solid fuel liners and gas liners are not suitable for solid fuel.

The fireback removal
If you have a small open fire then you will likely be removing one of these – a fireback. It is inserted into the builder’s opening to provide a shape desirable for the open fire. An SDS will make easy work of it as it is usually of a lightweight material (unless it’s a metal one).
Remove any backboiler carefully
NOTE: If you are removing an open fire then there may be a “back boiler” present in the fireplace (see pic below). These are essentially metal vessels (copper or steel), about the size of a shoebox, that sit at the rear of any flames and are connected via two pipes to a cylinder (in immersion cupboard) upstairs. The pipes often run up the sides of a chimney breast (hidden in boxing sometimes).

Image: Backboiler (usually two copper pipes exiting one end). If you puncture a back boiler that is connected to the water circuit then things will get very wet very quickly and the water can be scalding hot (if water is hot and keeps on coming then you are emptying your water cylinder which will be being replenished from a mains-fed storage tank above it). Even disconnected back boilers may still have a number of litres of water suspended in pipework.Some gas and electric fires will also have back boilers – these will likely have been removed with the units themselves but for open fires they are embedded in the excavation area. If you have had a cylinder removed then any back boiler will almost certainly be disconnected. There can though still be water in the leftover pipework. Skilled at plumbing? Drain down the system and remove the back boiler. Any doubts get a plumber in to advise. Do not throw copper back-boilers away as they fetch good money at the scrap merchants (£25-£35 as of July 2012).

Have you sorted that lintel or arch yet?
Whilst excavating your builder’s opening you must continually play detective. As I have stressed already, before you start excavating chip the wall plaster off around the recess area and you may see the builder’s opening immediately: a perfect recess with haphazard filled in brickwork or rubble. Take more plaster off and you’ll hopefully see the lintel or arch above the opening. Note that the back, left and right sides of the builder’s opening will be vertical and flat if made of brick: no interlocking brickwork (similar with stone but a little less easy to define). The non-interlocking of the bricks or stone helps define the edges. Your first job in any excavation is to find your supporting arch or lintel. The arch/lintel holds up the wall above the builder’s opening and there should be one (they can be missing or damaged).

With brick properties I am happy to do a certain amount of excavation in order to find the arch/lintel. Bricks are very good at providing their own structural strength and the whole wall is not going to collapse because of a metre wide hole. It is possible for a few loose bricks to fall though so take care (look inside the recess with a hard hat and goggles). With a stone or slate/rubble type property always find the lintel/arch before making anything other than a small hole. Stone/rubble does not lock together as well as brick and should be treated with great care.
ANY FURTHER TALK OF LOOKING FOR A LINTEL/ARCH IS AIMED AT BRICK-BUILT RECESSES.

In all cases one needs to check the lintel is suitable and safe (I removed the plaster from a wall to expose a lintel and found it to be a wooden beam with a huge crack along its length – I declined to continue). Start the excavation by enlarging the opening a small amount, working from the middle and moving outward to the left and the right. As the hole enlarges start working your way upwards and downwards.

Now that’s what I call a lintel! All the rubble is that added by the builder who fitted the tiny fireplace into the larger builder’s opening.
Remove any material to your skip. When you have a slightly larger recess and have dislodged any loose overhanging material stop. Get the torch out, the safety glasses and hard hat on and, after checking all appears safe, have a good look inside. Can you see the smooth (no interlocking material) left and right walls now? Can you see an obvious back wall (the back wall is usually very apparent as it is smooth or fairly smooth (nothing interlocking) and generally the same depth as the back of the brick chimney. A couple more of my scribblings:

Newer properties may have double-skin walls of block and brick or block and block. In this case do NOT open up any further than you see in the diagram. A cavity should remain in place.
BRICK BUILT RECESS ONLY: You should now be able to see a lintel or arch. If not then concentrate on working your way upwards whilst searching, rather than sideways, this to keep the width of the recess to a minimum and therefore the width of overhanging bricks to a minimum.

BRICK BUILT RECESS ONLY: STOVE FITTERS WILL USUALLY BE HAPPY TO WORK WITH OPENING WIDTHS OF UP TO ONE METRE WHILST “SEARCHING FOR THE LINTEL”. THERE IS USUALLY A LINTEL BUT IT IS NOT UNKNOWN FOR THERE NOT TO BE ONE. THE WIDER ONE GOES WITHOUT THE KNOWLEDGE OF A LINTEL THE MORE LIKELY SUPPORT IS REQUIRED. THAT SUPPORT IS USUALLY PROVIDED BY ACRO PROPS AND STRONG BOYS AND THESE CAN BE RENTED FROM TOOL HIRE STORES.
Here’s the proper way of fitting a lintel using acro props: Fitting a lintel using acro props
(external site). Find out more about lintels in lintels and beams.

A lintel that will end up a minimum 37cm above the top of the stove will give adequate clearance should it be necessary (as it often is) to have two elbows above the stove without the lintel being in the way. 15 or 30 or 45 degree elbows all can be chosen from depending on how much offset is required. An offset is sometimes required to provide the rear airgap as specified by the stove installation instructions.
Once you find a lintel or arch you can remove the bricks hanging under that lintel or arch, happy that the bricks above are supported. No suitable or suitably placed lintel or arch above your brick built recess? Did you chip off the plaster and go high enough (arches can be five or six feet above the hearth)? If you have identified that there is no lintel or arch, or have excavated as high as you wish to go and have still not got to the lintel or arch, then you are going to have to add a lintel at your required height. See lintels & beams. YOU MUST FIND OR FIT A SUITABLE LINTEL.

The stove fitter in the left pic (“Adding a lintel”) has decided that the arch is too high (he can see it from inside the fireplace) so is fitting a lower lintel (ensuring 6″ of lintel is supported at either end). Note that in some instances you might wish to put in a new lintel, higher than te existing lintel (see panel to right about elbow offsets). No builder’s opening to be found? In brick recesses the side jambs will never be less than 8″ wide so never enter this last 8″. If you have got to 12″ thickness and can see no evidence of a builder’s opening then stop. This is very rare. All of the time you are excavating left and right you will be taking note what or not the side jambs are holding up. Builder’s opening not wide enough? It is likely worth talking to a builder to see if the opening can be widened further.

This experienced builder was dramatically increasing the width and height of a rather small builder’s opening. In this case the new lintel is to be fitted just a few brick courses down from the ceiling and all the bricks below this removed. The props are used to support the brickwork above where the lintel is to go whilst this lintel is being fitted. The recess will then be widened from the floor all the way up to this lintel. The end result would be a recess some 24″ wider than it was, a recess that would be almost to the ceiling and leading to a stove with a 1.8m high black flue showing within the room. Not a job for the inexperienced but an example of what a builder might be able to achieve.

Image: Upstairs builder’s opening with the downstairs flues running left and right within the jambs, either side of the opening.
If your recess is on an upper floor then it is quite possible that the flues from downstairs fireplaces will run up the left and/or right hand side of your builder’s opening. The picture to the left is in an upstairs room and the left and right jambs are hollow inside – they are the flues for two downstairs fires! If these downstairs fires are gas or solid fuel and the flues are unlined you can imagine the problems should you leave any holes here: fumes from downstairs leaking into the room you are working in. Holes can of course be filled and made good.
Stove fitter’s motivational tip: I have excavated very many fireplaces and in all cases everything always works out in the end. Sometimes there is a little head scratching, sometimes the builder’s opening is not very clear etc. Once you see a structural lintel and have outlined where the builder’s opening is you can relax and enjoy the excavation.

You might hit a problem of the “gather showing beneath the lintel”. This can happen if the gather starts low and you require a slightly higher lintel or arch (maybe to cope with an offset flue pipe as already discussed). Note that the gather is structural, holding up the chimney. You do only have a couple of choices: 1. Leave the gather exposed (and paint the brickwork or leave it natural). 2. Add a lintel lower down and brick in any gap above that lintel (this may not be an option if an offset is required). 3. Shield the gather from view with a piece of Hardiebacker set into the top of the recess (leaving a small air heat trap above the stove). Looking up the chimney you will likely see one of a number of sights:1. A standard brick or stone chimney round, square or rectangular of any size. 2. A concrete-lined chimney (smooth ish). 3. A pot lined section flue usually 7-9″ diameter (usually in properties 1968 or later) often surrounded/held in place by concrete/rubble/brickwork. As well as these three common sights there is another possibility: composite lining e.g. Furanflex https://furanflex.com/en/ (recent innovation and I have not yet seen one). The three common types are pictured below.

In a standard brick or stone chimney you must remove ALL loose, infilled bricks and rubble that are/is “hanging without support” about the builder’s opening (often forming the throat for a smaller open fire installed into the original opening). The structure of the builder’s opening and chimney should be obvious and will be made of “constructionally sound interlocking bricks” but anything not interlocked requires removing. If you find yourself trying to remove anything that is interlocked with the builder’s opening then stop – it will be part of the builder’s opening (e.g. the gather). The end goal is a builder’s opening with smooth back, left and right walls and a chimney devoid of unsupported rubble and brickwork.

If the chimney has the “smooth hole” and has obviously been concrete lined (usually a ballon is inserted down the chimney and insulated lightweight concrete mix poured around the ballon with the balloon then being removed). This is usually a lightweight mix that does not require supporting (although there is no harm in supporting in the same way as for a pot lined breakout with an overhang situation if you wish). With this lightweight material just break away what is in the way.

If the chimney is pot-lined then what is surrounding the pot and what is holding it up? In the picture on the left the pot starts at the top of the inverted-funnel (the structural gather) at the top of the builder’s opening and therefore requires no additional support.But looking up from the builder’s opening you might just be seeing a mish-mash of hanging bricks/rubble with a pot in the middle. In this case extra support is required (usually a lintel raft arrangement leaving room for the flue pipe or liner up the middle). Probably a job for a local builder this one and difficult to describe here as each will be different (Building Control might advise). Of course there may be sufficient lintel support anyway.

The picture on the left is a classic example and was taken during a survey. As can be seen the pot flue and infilled bricks are unsupported, held by the mortar surrounding them. The builder had inserted rods from the front face of the chimney breast and into the rear wall as support. I suggested that a raft lintel would be more appropriate. Hearth removal: You will likely have a hearth to remove (unless it is good and solid and you are using it as the foundation for your new hearth.
Some hearths will, with a little assistance from your SDS chisel drill, come out in one or two pieces – straight to the skip usually. Often all you will have to do is use the SDS to knock out a little of the mortar used to bed the hearth onto. If you are unlucky the hearth will be inches of solid concrete. If so you have two choices: use the SDS to get rid of it all (you may need to hire something more powerful) or use this as a basis for your next hearth. If you leave a granite or slate hearth in place as a foundation score it well with a cutting disc so your mortar will bond to it. You might find metalwork under the hearth, this can be left in place (under your new hearth) or removed if in the way. They can take some excavating.