


Fit the smooth board closure plate (*lining part 2)
5 mins
Fitting the smooth board closure plate

Introduction
Follows on from the article: How to line a fireplace with smooth board
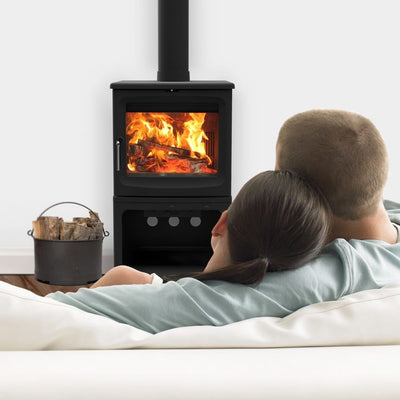
You are here because you are adding your stove into a fireplace and the chimney is being lined with a chimney liner. Your hearth is now finished. Your builder’s opening is the correct width for your stove and looking good. Your lintel or arch is in and the correct height for your stove and method of fitting. Your chimney liner is in and dangling.
If not, then you need to go to The Stovefitter's Manual and choose a suitable topic.
Chimney liner in chimney ready to go?
All you need now is to seal the chimney (using a closure register plate) and fit the stove to the chimney liner.
Lets’s look at some of my scribblings – examples of the two most common methods of fitting your stove.
Also see: opening up a fireplace, lining a fireplace, distance to combustibles, air gap above stove, how to fit a chimnney liner

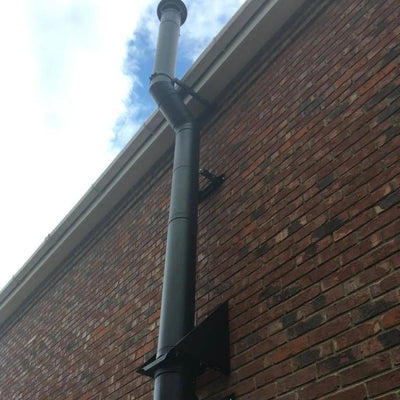
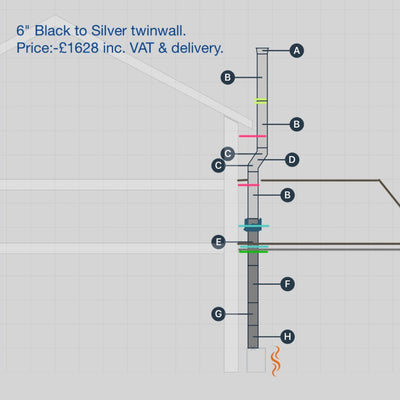
Vitreous pipe to chimney liner: off the TOP of your stove
Smoke rises. Off the top is always best as less likely for puffs of smoke to enter the room on initial lighting (compared to "off the back" where this can happen and is a pain).
Performance is also generally better "off the top".
That little square between the pipe and the liner is an “adaptor”.
Straight up (no bends) is the most simple and is possible as long as your builder’s opening is deep enough to allow sufficient air gap behind the stove (required gap will be stated by stove manufacturer but if wall is non-combustible then usually 5cm is enough).
10cm air gap minimum if wall is Hardiebacker lined as Hardiebacker can spider-crack (cosmetic).

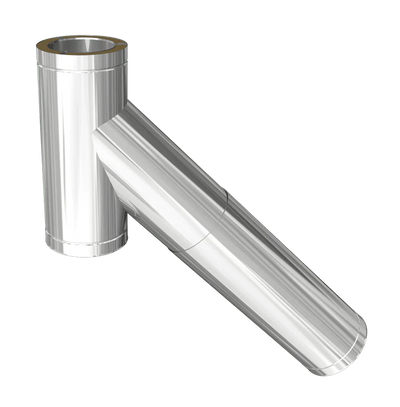
The second graphic shows two vitreous elbows (30 or 45 degree elbows), combined to create a 4 to 5″ offset, to distance the stove from the back wall to create the required air gap. We’ll come back to this offset method.
Note: A few stoves (rare) CANNOT be swept through the stove so you will need to have a sweep-door in the pipe between the stove and the closure plate (in an elbow or in a straight section of steel vitreous pipe).
Also see: Air gap above stove
Also see: Fitting packs (includes infographic to help you choose which of the above two methods to go for)
As long as your builder’s opening is made of brick or stone with NO combustible materials (plasterboard is classed as combustible) then there are no Building Regs that stipulate the size that your builder’s opening should be and no regulations that dictate any air gap requirement around that stove once it is in the recess. BUT, there will likely be "recommended" air gap requirements provided by stove manufacturer’s unique to each stove (usually in the stove’s installation instructions so download these prior to purchasing the stove). Under-confident Building Inspectors may insist on these "recommended" air gaps even if there is no obvious safety reason to adhere to them.
Why the air gap anyway? To ensure the heat from the stove gets to the room rather than being soaked up by the building (tucked into a small recess the stove output-to-room may disappoint).
What is the height required between the top of the stove collar and the closure plate if two elbows are on top of each other? 30cm covers this but allow 50cm if one elbow has a soot door. Height above stove is rarely mentioned anywhere for some strange reason but I mention it in my article Heat Shields and Distance to Combustibles for Wood Stoves.
Note that different brands of elbows will have different heights when added together to form an offset. You do not want to be going through your closure plate at an angle as the sealing plate will not work. More about offset dimensions in my infographic: Fitting Packs.

Vitreous pipe to chimney liner: off REAR of stove
Before going further - off the top is best.
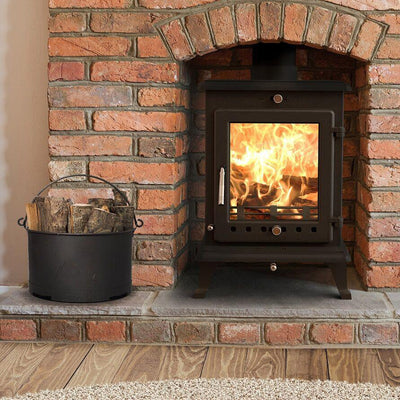
This black steel vitreous flue does not have an offset and is off the top - the perfect situation.
The pipe is passing through a sealing plate (available from our store and included in our Fitting pack). Note the A1-fire-rated Hardiebacker lining board within the recess.

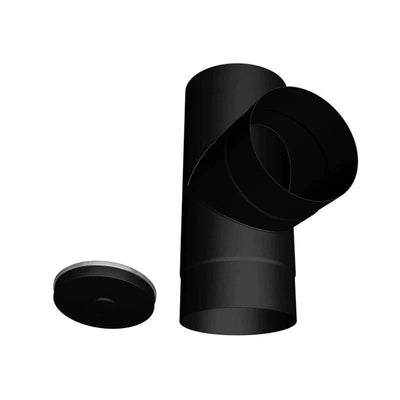
Or you use a “T” off the rear of the stove.
But only if your recess is good and wide so you can access it to sweep up through the T (you need to access the soot collecting door which points down to the ground).
Off the back is not so good.
The stove may leak smoke from its open door (whilst lighting) until the fire is established and the chimney warmed.

Warning
Heat rises and does not like travelling horizontally. Flue pipe should not travel horizontally any more than the diameter of the flue pipe used (so max 5″ horizontally for a 5″diameter pipe and 6″ for a 6″ pipe).
It is not a good idea.
Don't do it.
Fitting a register plate or closure plate
Before we go any further let’s first make sure we understand the difference between a closure plate and a register plate (both seal off the chimney from the room and are the ceiling above your recess).
A register plate is metal and used when there is no chimney liner. If a liner is present then the plate can be any non-combustible material and the plate becomes cosmetic (it does not hold the smoke back like a register plate).
Now, what situation are you in exactly when it comes to your recess?
1. You are following my “smooth-lining” instructions and wish to continue with this method.
2. Your inglenook is unlined (brick/stone/rendered etc.) with no lining board.
We will look at these two scenarios separately but if you are a number 2 ;-), then I would still read the instructions aimed at the number 1’s as a lot if this is relevant.
Closure plate – following on from the “smooth-lining” instructions
Follows on from my article about smooth-lining a fireplace

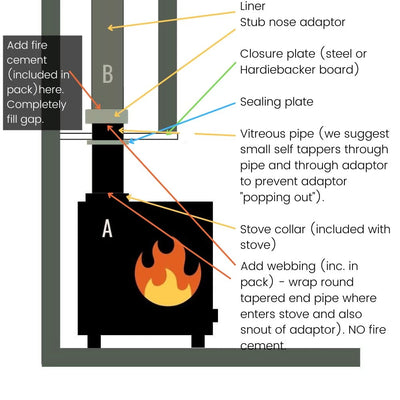
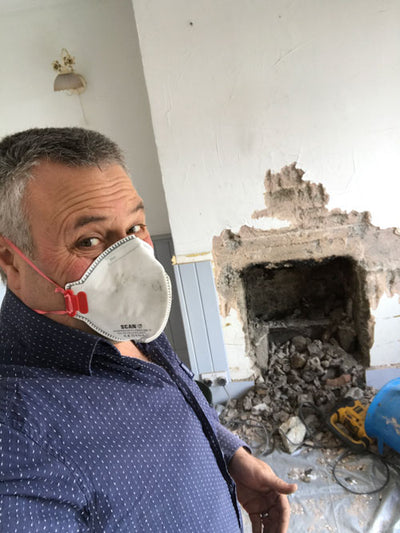
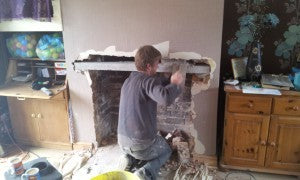
You should have something that looks like the picture above (without my colleague in the picture unless he has been moonlighting). The left, right and rear of the recess are lined with cement board and a dangling chimney liner is present. As I have suggested in the smooth-lining section you can, if you wish, fit the closure plate before the liner goes in, and even before the wall-lining (just adapt the instructions as required).
Your next job is to cut a piece of concrete board (12mm Hardiebacker) that will slide in on top of the three lining boards already in place, like a slide in shelf. You will cut a hole in the board for the flue to pass through (I spy one in the picture ready to go, leaning on the left chimney breast). We will look at the hole in a moment. This top plate is your closure plate. I know that the chimney liner is in the way, I’ll come to this.
Before the closure plate design commences I usually connect my “adaptor” to the bottom of the chimney liner (adaptors can have differing lengths of nose and have two methods of attaching to the liner – bolts or self tappers). If using self tappers they will pass through the liner and both walls of the adaptor (choose a length so they only protrude a few mm into the inside surface of the adaptor). Better still buy our adaptor with captive wing nuts.
You will likely chop some of the bottom end of the chimney liner off so you have a nice clean end to fit the adaptor to. The chimney liner slips easily into the top of the adaptor (between two surfaces) and the bolts tighten to secure it (or use the self tappers). The small gap between the top of the adaptor and the chimney liner – fill this with fire cement.
Adaptors have various lengths of “nose”. A long-nose adaptor can be useful as it adds "telescopicity" to the system (I think I just made up a word).
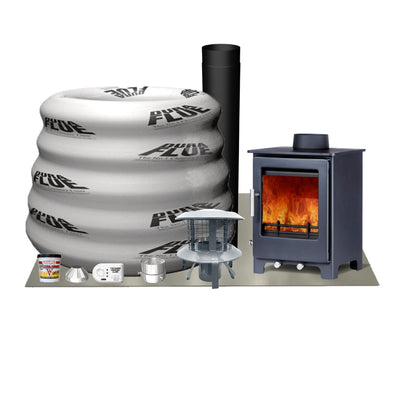
Fitting Pack available from Stovefitter's Warehouse


I now add my vitreous pipe to my adaptor, sliding my adaptor (the male) into my female vitreous pipe. If this is a loose fit use fire cement or fireproof webbing around the snout of the adaptor and secure using three self tappers. Webbing, drill bit and self tappers are included in our Useful Items Kit which is included in our Fitting Packs (everything needed to fit a liner to a stove).
You will end up with something like the first image in this article, with the snout of the adaptor and the attached black pipe dropping through the oversized hole. I like this picture. It almost shows how to fit a stove all in one picture. You can see the hearth, the lining boards, the lintel and now the adaptor dropping through with two offset elbows connected.
Next you will go to the top of the chimney and pull the chimney liner up until the vitreous/adaptor combo is out of the way for the moment above where your closure plate is to go. If the top of the liner has already been secured and scaffolding now on somebody else's house then you are buggered! Not really but it is not now so easy. You just have to use a long-nose adaptor and have the snout hang half way through the Hardiebacker board and put the closure plate on before any side lining-boards. We will look at this situation shortly.
With the closure plate cut to size (usually a square or rectangle) measure the width of the board (left to right) and mark a centre line. Best also measure your fireplace width as this centre line will be where your flue pipe ends up.
You then have to work out exactly where to cut your hole.
You can clearly see the centre line and this dictates where your hole will be (left to right). Where your hole will go forward to back will depend on where the rear edge of your lintel is and where your back wall is – it will be somewhere in between the two.
I used a grinder to cut Hardiebacker. Kenny uses jigsaw blades. It is essentially concrete board so choose cutting device accordingly.

The square “sealing plate” shown is the one bit of kit that I fit on every stove installation and once again is found in our Fitting Packs. It is a square of stainless steel with a simple fireproof gasket. It is available in 5″ or 6″. It provides a neat and tidy method of allowing flue pipe to pass neatly through the closure plate. The one I supply is galvanised and can be sprayed black with stove spray paint if required.
Many fitters, having not heard of sealing plates or wanting to save a few pounds, just cut a hole in the closure plate. They cut this hole a couple of mm more in diameter than the flue and they later fill the gap with fire cement or fireproof rope. The fire cement or rope almost always falls out at some stage and sometimes the concrete board cracks under the extreme heat of the pipe. Also, if the hole is slightly off-centre (it is not easy to be mm exact) then your stove will be off-centre in the recess (5mm out does not sound enough to worry about but it can be very obvious to a keen-eyed customer should a knob in the centre of their stove not lined up with the centre grout-line of the hearth). The little sealing plate allows last minute stove adjustments left or right, forwards or backwards (of a cm or more) to ensure the stove is central in the recess and the flue pipe is vertical. It also protects the concrete board from direct heat.
Place your square sealing plate on your new closure plate and put it exactly where you want it to be. You will be bearing in mind that you ideally will need to ensure your adaptor will be a minimum 2-3cm clear of the front or the back wall of the chimney because the adaptor is a little bulkier than the pipe or liner. If you are not using offset elbows you may want it as close to your lintel as possible but not so close as for the liner or adaptor, or its bolts, to foul against the lintel or wall. Ensure the bolts on your adaptor are not in the way (the adaptor can of course turn on the liner before tightening so the bolts can be sticking out somewhere harmless (there are three bolts).
When you cut out your hole you can afford to have it a reasonable size. As long as it is smaller than the square and there is material left for the four screw holes to work then all is good.
Note also extra inspection hatches also aid fitting and inspection (only possible on larger closure plates and no good if adding insulating beads, (insulating a liner I do not advise as a rule).
Note: if you are really struggling to fit a closure plate then you can cut a huge great hole in your plate and add another plate over that hole afterwards (the second plate has the cover plate on it (so essentially you are creating a much bigger cover plate out of Hardiebacker concrete board). This can help you to get to your adaptor if you need to (for example if your liner is set in place and you need to attach your adaptor in situ).

In the picture with the red and blue arrows, the chimney liner enters the arena at an angle from the left and so it has been necessary to add an elbow to the bottom of the adaptor (in my experience this is always a 30 degree elbow). Make sure you connect your elbow to your adaptor with a metal to metal self tapper (we do not want the elbow coming off when the sweep comes).
To avoid confusion “cut edge below bump” means that the installer has cut the female end of the vertical flue pipe and slid it over the male elbow – and this picture shows how neat that can be if done well. Use a grinder with a 1mm thick 115mm diameter metal cutting blade. Often there is no need to cut vitreous pipe (buy it in lengths 250, 500, 1000mm).

There is nothing to stop you fitting your closure plate first, before your side and rear boards as can be seen in the scribble-drawing.
It can be a lot easier as the liner/adaptor is never in the way (you lift the plate UP rather than slide it IN).
All you need is some thin metal angle and use it to support your closure plate.
We did this once on a job when we had to do a very swift closure plate because the hire company wanted the cherry picker back and we did not have enough time to do the rear and side boards.

Now you will connect your closure plate to your lintel using a couple of short Thunderbolts to secure upwards.
Note the use of plastic wedges to ensure the Hardiebacker stays perfectly horizontal.
Depends on what gap you have as to what the spacers are like. If a 1cm gap use 1cm spacers.
The spacers stay in forever.

If there is a big gap (more than a few mm) between the top front edge of your closure plate and your lintel then you will have to fill that gap before using Thunderbolts to screw your closure plate to your lintel. If you do not do this the plate will lift at the front and open up a gap above the side-of-recess boards (small gaps can be filled with Decorator’s Caulking). If it’s only a few mm of gap you might choose not to worry about it. If its a cm then you will have to be creative (e.g. 1cm pieces of copper tube as spacers with the Thunderbolts going through the middle). If, after screwing to lintel, your closure plate rises up at the back a little, then you can somehow weight it down (a couple of bricks fed in through the hole) and reach in through the hole and add mortar in strategic places. If it is only a few mm then Decorator's Calking to fill the gap is fine.
If your adaptor/vitreous combination is slid up the chimney out the way the rest of the job is easy. If cowl already fitted and you cannot get to chimney pot jump to next section.
Remove your stove from it’s packaging and assemble it according to its user manual. Most stoves have a rear exit flue hole and a top exit flue hole. Choose which one you are using and fit the stove’s blanking plate to the other with the parts provided (you will usually seal this with supplied rope or webbing or use fire cement). Fit your stove collar (again you will usually seal this with supplied rope or webbing or use fire cement).
You may have to bolt on the stove legs (if you have adjustable legs make sure the adjusters are loosened ready to go – they are sometimes bolts in threads and more difficult to sort out when the stove is in the recess).
Slide everything down so the vitreous pipe inserts fully into the stove collar.
Back up to the top of the chimney where your liner is sticking up skyward a metre or so.
Using a marker pen mark a line about 2cm above the top of your chimney pot. Cut at this point using a hacksaw or grinder or tin snips.
Get your helper to slide the adaptor/vitreous combo up the chimney about 30cm.
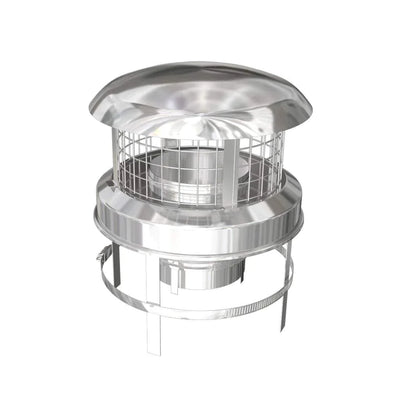
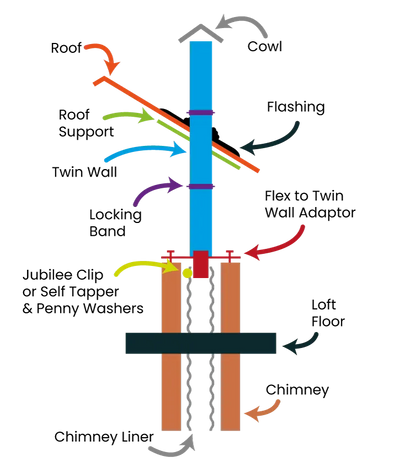
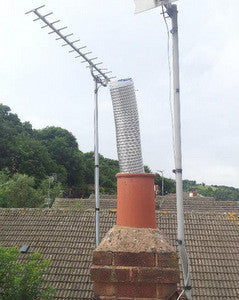
Fit your Duraflue Stainless Steel Liner Cowl.
Slide everything down into stove remembering to add your sealing plate around your vitreous pipe.
Use supplied Jubilee clip to attach cowl to chimney pot.
Screw sealing plate to closure plate using four large self-tappers in Useful Items Kit (included in Fitting Pack).
If your cowl is already fitted and liner cannot be moved up or down chimney
Position your stove on the hearth and plan your steel vitreous flue configuration. This may just be one piece of pipe or it may be more complicated.
You can cut steel vitreous flue pipe if required. I use an angle grinder with a very thin metal cutting blade of approx. 1-1.5mm thickness. Make sure you wear long sleeves, eye protection, dust mask and gloves. Please take this very seriously as the thin blades can shatter.

Warning
YOU CAN ONLY CUT THE FEMALE END OF THE VITREOUS (THE TOP OF EACH PIECE)
IF YOU CUT THE BOTTOM, NARROWER MALE END YOU RENDER THE WHOLE PIECE OF PIPE USELESS.
I use masking tape to get a perfect line and then carefully cut all the way round. If you have an offset (two elbows) the piece you are most likely to cut is the small vertical piece on top of the elbows (you might be lucky and find that your elbows are the perfect height anyway.
I have always refused to cut gloss stove pipe (expensive and may chip).
Use a long-nose adaptor as this means you have a few inches of telescopic safety. Why do you need this "telescopic" feature? Because your liner will not usually compress upwards. Because the bottom of your vitreous slides into your stove collar a whole inch or so. So you slide your vitreous over your adaptor snout and all the way up. Then you slide your stove underneath. Then you slide the vitreous down and into the stove.
NOTE: Make sure your long nose adaptor does not slide into an elbow too far and block off half the diameter of the elbow (slide it into the elbow as a test before you fit to see what I mean). Also make sure your adaptor, if a long nose, does not slide in and seal any soot door if you have one – or in a year’s time you’ll get a phone call from an angry sooty fella with a brush.
Closure plate – your inglenook is unlined (brick/stone/rendered etc.)
Your closure plate will be made from the same material: Hardiebacker 12mm concrete board. You will use the same sealing plate. The main difference here is that you will not be able to slide your closure plate in on three nice “side/back boards” and so you must find a way of fixing the closure plate in place.
The traditional method is to screw metal right-angle to provide a “shelf”. If your recess is nice and rectangular with smooth walls then this is easier than if the reason is “all over the place” (e.g. stone).
If your recess is all over the place then you will probably have to make it up as you go along. One method is to cut the closure plate as close as possible to the shape of the recess (maybe in two or three pieces if it is proving difficult in one). Then wedge or prop it in place and insert strategically placed Thunderbolts as “pegs for the board to sit on. You can hide these pegs by smearing mortar into your corners. If you have room then adding access hatches to the plate means you can add mortar inside the chimney, on top of the plate (or you might be able to reach through your flue hole if you can get the liner out of the way).
You might only need a few Thunderbolts to help it stay in place whilst your mortar sets.
You might find that you can just screw or Thunderbolt your plate straight into your lintel.


You can put your closure plate where you wish. Higher can be easier if using offset elbows.

Avoid the void to prevent wasted heat.

Want an inspection hatch for peace of mind. Make from Hardiebacker.

You might hit a problem of the “gather showing beneath the lintel”. This can happen if the gather starts low down, especially if you require a slightly higher lintel or arch (maybe to cope with an offset flue pipe as already discussed).
In this case you do only have a couple of choices:
- Leave the gather exposed (and paint the brickwork or leave it natural).
- Add a lintel lower down and brick in any gap above that lintel (this may not be an option if an offset is required).
- Shield the gather from view with a piece of Hardiebacker set into the top of the recess (leaving a small air heat trap above the stove).

Very small closure plate fitted using angled steel, Hardiebacker and sealing plate.
Note that a closure plate is “cosmetic” and does not have to act as a barrier to prevent smoke entering the room (the stove/liner combination is a sealed system with no smoke escaping).


FAQs
See all FAQsCosts correct as of April 2023:
Approx. costs if you have a chimney and fireplace ready to use: £750-£1,000 (save £500 by self-installing).
Approx. costs if you have a chimney but need the fireplace "opening up": £1,600-£2,200 (save £1200 by self-installing).
Approx. costs if you do not have a chimney and need a clip-together flue: Shed £475-£700. Bungalow £1500. 2-storey house £2500. Save £1,000-£1400 by self-installing.
Above figures include labour and materials but no appliance.
We, of course, advise you to purchase your stove and materials from Stovefitter's to ensure quality goods are installed (some installers use budget materials to increase margin). If you buy your stove from us (rather than your local small shop or installer) we have a lot more power when approaching manufacturer's with a warranty issue. Why is that? Because we buy many hundreds of stoves a year from these brands.
We do not fit stoves.
But we know a few who do!
Google: Hetas installers
Hetas are the trade body of registered UK installers.
Most installations will require that you slide a chimney liner down your chimney (flexible metal tube 5" or 6" in diameter). Do you have a narrow chimney and want to lessen the risk that a liner might not go down your chimney? Then make sure your chosen stove can use a 5" liner.
Must I line my chimney? Best read this article but most likely the answer is yes. Do I have to fit a chimney liner?
DEFRA-Exempt wood burning stoves with a 5″ collar can usually be fitted to a five inch liner rather than the usual 6″ minimum, making the installer's job much less stressful.
ALL OF THE 5KW STOVES WE SELL CAN BE FITTED TO A 5" CHIMNEY LINER.
I seriously suggest any self installer fits a 5" liner unless they know their chimney is large enough for a 6"!
What is the best chimney liner? Silvacore 904 (we sell it so of course we will say that ;-). What is the best chimney liner?
Useful links
Will your stove require an air vent within the room (some stone walls are very difficult to drill)?
5kW or under and wood burning stoves often do not require an air vent (new builds always require an air vent).
Useful links
What is the maximum output in kW of your "5kW" wood burning stove? The majority of manufacturers just specify the “nominal output” and this figure means very little in real life. The nominal is a figure the manufacturer chooses to sell the stove at - the stove is capable of reaching at least this output with one fuel load. Nominal means "capable of". But it is not the maximum.
Check out the size of the area where the logs will go (firebox size) as this varies enormously. The kW output is completely dependant on the amount of logs burning at any one time - more logs burning equals more heat. If you can fit three logs in stove A and just two logs in stove B then stove A will be capable of throwing out 33% more heat.
DO NOT TRUST MANUFACTURERS’ kW RATINGS as manufacturers specify what output they desire to sell the stove at and testing allows for much “playing with the figures”. This is why you can get very small 5kW stoves (e.g. Aga Little Wenlock) and very large 5kW stoves (e.g. DG Ivar 5 by Dik Geurts which is actually rated 5kW but has a MUCH larger firebox than the Ekol Crystal 5 by Ekol Stoves). A Crystal 5k might get to 5kW and not be capable of any higher whilst a DG Ivar, despite being rated at 5kW, can get to 8kW with a full fuel load.
Note that, over time, one might damage the internal firebricks of a stove by running at a higher load than the manufacturer's suggest. Firebricks are easily replaceable.
Useful links
Will your wood burning stove fit in your recess WITH the required air gaps around it? This is obviously not an issue if your stove will be freestanding.
Air gaps to non-combustible materials (brick, stone etc.) are usually "as close as you like" legally but manufacturers will sometimes specify a recommendation. This recommendation is there to allow heat to escape from the recess into the room - so you get the heat benefit rather than the heat soaking into the building structure and being lost. If no gap to non-combustibles recommended then we suggest 50-100mm air gap left and right of stove, 50mm behind and 100mm above.
Are you in a Smoke Control Area (usually built up areas)?
Choose your stove accordingly.
A stove must be DEFRA-Approved if you wish to burn wood in a smoke control area.
ALL OF THE STOVES WE SELL ARE DEFRA APPROVED FOR SMOKE CONTROL AREAS.
In simple terms if a stove has an efficiency rating of 70% then 30% of the heat from your logs goes up the chimney.
If a stove has an efficiency rating of 90% then only 10% goes up the chimney.
So think of this in terms of how many logs you have to chop/buy.
Example: A Saltfire Peanut 5 by Saltfire Stoves in Dorset has an efficiciency of 80%.
A tall chimney (6m or more) that is lined will be happy with an efficient stove.
Efficiency importance can be said to be overrated and anything between 75% and 85% is fine. Go much higher and performance can actually suffer (smoke in room when opening door to reload, blackening of glass).
Many modern stoves can go on 12mm thick hearths. Others require full, 5″ thick constructional hearths. All of the stoves we sell state whether or not a 12mm hearth is suitable.More about hearths for wood stoves here.
Helpful links
Can you can talk to somebody on the phone should you need to after the wood burning stove has been delivered, especially if you are self installing? Will the staff at “wesellzillionsofstoves.com” be able to assist with any installation issues? What if there are any problems after install?
Do yourself a favour before ordering stoves or materials on the Internet: Go to Trustpilot and type in the company name before you buy. Some companies advertising at the top of search engines are not good news - check for yourself.
When striving to find thebest 5kW wood burning stovesyou will likely be bewildered by the choice. There are many to choose from. The question I get asked most in our shop is “why should I pay <£1,000> for this one when this other one is just <£500>?”. Here is the very simple answer:the cheaper wood stoves are made in Chinaor Eastern Europe whilst the more expensive are made in Western Europe (or sometimes the USA). Here are a few examples where a more expensive stove might excel over a cheaper stove:
- Aesthetics (more time spent on design)
- Hinges (sometimes hidden on more expensive stoves)
- Better quality glass
- Thicker steel (longer life)
- Improved door locking mechanisms
- Longer warranty
- Improved controllabilty of flame due to more resource invested on design of air flow within stove
- Brushed steel fittings instead of cheapy chrome look
Open and close the door on a cheap Chinese stove. Then open and close the door on a DG stove, Arada stoves, Woodford stoves, Hamlet stoves or Saltfire stoves. You’ll understand the difference.
Stove pricing reminds me of wine pricing. A £20 bottle of wine is not double the quality of a £10 bottle of wine (the drinking experience might be improved by 20% as an example). We are talking “the law of diminishing returns here. They are all “fire in a metal box” at the end of the day.
Yes. However, there are specific regulations and restrictions in place to address air pollution concerns, particularly in areas designated as Smoke Control Areas. In these areas, only approved "smokeless" fuels or exempt appliances, such as Defra-approved wood-burning stoves, can be used. These stoves are designed to burn wood more efficiently and produce fewer emissions.
All the stoves we sell are DEFRA approved and Eco-design approved and suitable for all areas of the UK.
Terminology
View all TerminologyA stainless steel tube, slides down a brick/stone chimney to provide a smooth and safe route for smoke.
All of our stoves are approved by DEFRA to burn wood in all UK locations including Smoke Control Areas (towns and cities). Not all stoves are, so be careful if buying elsewhere.
All of our stoves are ECODESIGN approved to be sold in the UK. Not all stoves are, so be careful if buying elsewhere. ECODESIGN is mandatory by law since January 2022.
The base your stove sits on.
If the chimney is the polo mint then the flue is the hole.
Use this text to answer questions in as much detail as possible for your customers.
Helpful links
Buying guides
The Stovefitter's Manual
How to choose a wood burning stove for your property (includes infographic)
Infographics

What size wood stove do I need? Don't let manufacturers fool you!
Buying Guides
Do I need an air vent for a wood burning stove? If I do not bother?
Buying & DIY

Knowledge Tree: Process of buying and installing a wood burning stove
Buying & DIY
Chinese wood burners – should I buy one or are they all crap?
Buying Guides

What else do I need to buy to install a wood burning stove?
DIY Guides
Infographics for wood burning stove purchase and install
Infographics
Wood burning or multifuel stove? A stove fitter decides.
Buying Guides

A few words from Julian
Buying & DIY